|
Mitutoyo Releases The "UMAP Vision System", A Fine-Contour Measuring Machine Based On A Unique Measuring Principle That Has Made Possible Contact Measurements By A Super-Fine Stylus. |

The "UMAP Vision System"
|
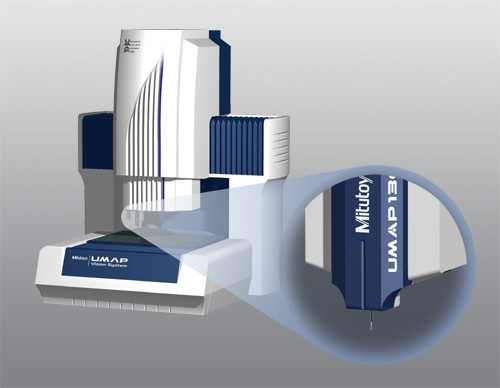
Mitutoyo Corporation has developed a fine probe named "UMAP130", which supports ultra-precision, ultra-fine processing, and a fine contour measuring system named "UMAP Vision System". The sales start on December 21, 2002. These new products will be exhibited at "the 21st Japan International Machine Tool Fair (JIMTOF2002)", which opens on October 28, 2002 at the Tokyo Big Sight. As nano technologies are developed, ultra-precision, ultra-fine processing technologies using MEMS (Micro Electric Mechanical Systems) are drawing attention. The smallest CMM probe diameter that had previously been used for contour measurement or dimensional measurement was Φ0.4mm. Therefore, the measurement of fine, deep holes made with nano technologies had its limit. The newly developed, fine probe "UMAP130" has a stylus with tip diameter ofΦ30μm(=0.03mm), axis length of 2mm, and aspect ratio of 66.7. This new probe, based on a unique principle, has made it possible to measure fine contour by contact. The UMAP130 makes its very fine stylus slightly vibrate, and by sensing the fluctuation of the amplitude of this vibration it makes a contact measurement possible. It supports a wide variety of applications, including: measuring the inside diameter of optical fiber connectors, or ferrules (which are being used in more and more products); measuring the inside diameter of the fuel injection nozzles for automobile engines (which are becoming increasingly small and ultra-precise, in pursuit of low fuel consumption and high-performance); measuring the fine-contours of base plate bearings of watches and those of ultra-precision metal molding, etc. The fine contour measuring system "UMAP Vision System" is equipped with a fine probe, "UMAP130", and a vision probe as standard accessories. It first captures the measuring target on the image screen, then allows the contact measurement of a fine, hard-to-see detail (such as ultra-small, deep hole, etc.), using the UMAP130. It can also be used like a normal vision measurement machine with use of the vision probe. Also, the Touch Signal Probe TP200, which is used for general CMMs, can be installed on it with use of the special attachment. Thus, the "UMAP Vision System" can be used for a wide range of applications, from fine-contour measurement and general coordinate measurement to non-contact vision measurement. |
|
[Sales speculation] |
|
Expected sales for the first fiscal year: 50 machines |
|
[Features] |
| (1) |
Allows contact measurement of fine contour by the ultra-fine stylus that has a tip diameter of |
|
| • |
The newly developed ultra-fine probe "UMAP130" has an ultra-fine stylus with a tip diameter of Φ30μm, length 2mm, and aspect ratio 66.7, allowing the measurement of ultra-small, deep holes, etc. *UMAP - Ultrasonic Micro and Accurate Probe |
|
| (2) |
By installing the image probe on the UMAP, fine detail to be measured can be captured on the screen, and it can also be used as a normal vision measurement machine. |
|
| • |
With the image probe, those fine details that are hard to see can be positioned accurately. It can be also used as a normal vision measurement machine. |
|
| (3) |
Allows installation of Touch Probe TP200 for CMM. |
|
| • |
When the special attachment is used, the probe can be exchanged with the high-accuracy touch signal probe TP200 for general coordinate measurement. |
|
| (4) |
The ultra-fine stylus unit can be removed or replaced by the user. |
|
| • |
Taking the ease of maintenance into consideration, the UMAP130' s ultra-fine stylus unit is designed to have a mechanism that allows the user to remove or replace the stylus himself. |
|
|
[Specifications] |
| UMAP Vision System | |||
|
Measuring range (X x Y x Z) |
Vision | 300 x 200 x 200mm | |
| Vision + UMAP | 245 x 200 x 200mm | ||
|
Tip of UMAP130 |
Tip diameter: Min.Φ30μm Length: 2mm Aspect ratio: 66.7 |
||
|
Accuracy |
Image | Accuracy of X- and Y-axis | 0.8+2L/1000μm |
| Z-axis accuracy | 3+2L/1000μm | ||
| TP200 | Volumetric error | 2.0+3L/1000μm | |
| UMAP130 | Repeatability | σ=0.1μm | |
|
Measuring speed |
TP200 | 3mm/sec | |
| UMAP130 | 100μm/sec or slower | ||
|
Resolution |
0.01μm |
||
|
Vision unit |
Illumination system |
Vertical reflected illumination/Circular illumination |
|
| Observation system |
Optical system with fixed magnification + CCD camera |
||
| (L: measuring length in mm) |
|
[Measurement principle of UMAP130] |
|||||||||
|
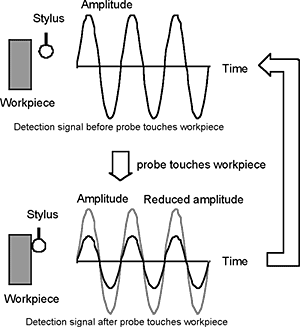
The UMAP130 gives its stylus a very fine vibration. It achieves contact measurements with a very fine stylus contouring by sensing the fluctuation of the amplitude of this vibration. The outline of the measurement principle is as follows: |
|||||||||
|
|||||||||
|
By employing this measurement principle, the UMAP130 makes the contact measurement with its ultra-fine stylus possible. |
|||||||||

|
[Customer Service Contact] |
|
Vision & Optical System Group (Mitutoyo Corporation - Overseas Sales Division) Phone: 81-44-813-8233, Fax: 81-44-813-8231 or E-mail: VISION@mitutoyo.co.jp |
|
October 22,2002 |
|
|
|
[ Close ] |