|
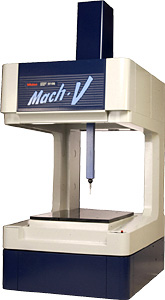
Mitutoyo Releases In-line Type Coordinate Measuring Machine MACH-V Series with High Throughput |
At present, major automobile companies, which are said to produce 15,000 to 30,000 vehicles per month, employ in-line measurement in the process of automobile production. To increase efficiency, in recent years these automakers have been making efforts to "make production lines flexible" so that they will be able to reduce production costs, with the ultimate goal of increasing profits. The automakers have been shifting from the conventional production line based on transfer machines to one based on machining centers. When it comes to flexible production, they find it difficult to cope with this shift if they use conventional inspection jigs specially designed for workpieces, or if they seem to be planning to manage inspection data. Meanwhile, many manufacturing sectors are shifting from the method of limited production of diversified products to flexible production, which allows for the short-term concentrated production of what can be sold at the time. To meet these needs, Mitutoyo in particular has developed the new series as a set of high-throughput CNC coordinate measuring machines designed for on-site measurements on the basis of its coordinate measuring technology cultivated over a period of many years. To serve as a system with high functionality, its main unit has achieved high rigidity and optimal weight distribution through structural design using FEM analysis. This also consists of using a linear guide system that takes the on-site environment into consideration, protecting the main unit with a dust-proof cover, and making the system partially maintenance-free. With its compact design, the special-purpose control panel also enables manufacturing workers to operate with safety and simplicity. In terms of in-line measurement, meanwhile, it is necessary to be able to perform partial workpiece measurement so as to check the shape of the replacement portion when changing cutting tools. Combined use with an optional touch-screen panel makes it possible to visually specify the portion to be measured. This system has thus been developed from a comprehensive standpoint to meet all possible needs. |
|
[Sales Projections] |
|
Sales projection for first year: 50 units |
|
[Features] |
|
(1) |
Compact body and unique open design: an evolution from Mitutoyo's original coordinate measuring machine |
|
As a successor to Type A and Type F, which were the starting point of Mitutoyo's original design, the new system has adopted an open structure based on an optimal structural design using FEM analysis. The width of the measuring machine has been reduced by 15% as compared with other Mitutoyo products to make it easy to carry in and out workpieces and help to reduce the length of the machining line. |
|
|
(2) |
High throughput and flexibility |
|
The system has achieved a high throughput of maximum traverse speed (866mm/s) and maximum acceleration (0.86G), as well as a high precision of indication error (E=2.5+3L/1000μm). It also takes into account the on-site environment with standard specifications that offer a temperature compensation function that operates in a broad temperature range from 15oC to 35oC. Highly reliable results can be obtained even when measurements are taken at manufacturing facilities that often involve large temperature variations. It also comes with a contact-type workpiece thermometer capable of following performance and temperature changes, which can be used to take measurements on extremely hot workpieces after machining. Additionally, fully covering the main unit of the system lessens the impact of environmental temperature changes and helps to maintain high precision in on-site environments. |
|
|
(3) |
Fully dust-proof measures |
|
Unlike on previous models, the coordinate measuring machine's drive unit, guide unit, and scale are all covered to protect against the surrounding environment. Use of the high-performance linear guide, which is field-proven with the existing LEGEX 322 and MACH series, has made it possible to build coordinate measuring machines more suitable for on-site application. |
|
|
(4) |
High-precision coordinate measuring machine |
|
In the drive system of this coordinate measuring machine, balance of the linear guide load resistance is maintained by using a field-proven method of roller friction, which was independently developed by Mitutoyo, and placing the drive axis closer to the center of gravity of the moving parts. The Y-axis, in particular, uses a new "center drive system" (patent pending) that drives the X-axis beam. |
|
|
(5) |
Improved maintainability |
|
The guide and drive units are equipped with automatic lubricators to make the system as maintenance-free as possible. Also, "maintenance-oriented" layouts have been adopted for the controller, cover, wiring, and the like. |
|
|
(6) |
Inexpensive system with high functionality |
|
Mitutoyo has created an unbelievably inexpensive system by introducing the latest design and machining technology, as well as thorough cost-cutting techniques, such as part integration. |
|
[Features of the special-purpose control panel and touch-screen panel (optional)] |
|
(1) |
These panels eliminate troublesome operations, and allow the system to be started by simply pressing the start button (They can be altered based on user specifications). |
|
a) Quality control during continuous production |
|
|
(2) |
While looking at the workpiece screen on the touch-screen panel, measurement items can be selected to perform "partial measurement," which is the process of extracting only measurement items from a part program, and this is indispensable for in-line measurement after cutting tools or repair equipment are replaced. |
|
a) Quality control after changing production conditions b) Quality control when changing cutting tools c) Quality control after repairing machining equipment (These can be altered based on user specifications.) |
|
[Specifications] |
|
|||||||||||||||||||||||||||||||||||||||||||||||||||||
|
[For Information, Please Contact] |
|
Coordinate Measuring System Sales Group, Overseas Sales Division, Mitutoyo Corporation Phone : +81-44-813-5410, Fax : +81-44-813-5433 or E-mail : CMM@mitutoyo.co.jp |
|
October 28, 2004 |
|
|
|
[ Close ] |
