|
February 23, 2010
|

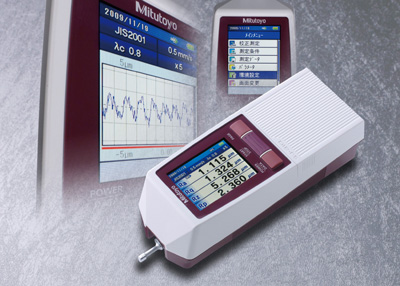
Release of "Surftest SJ-210 Series" - The New Standard of Field-oriented Portable Surface Roughness Testers

Mitutoyo Corporation (Headquarters: Takatu-ku, Kawasaki City, President: Toru Nakagawa) has developed and commercialized Surftest SJ-210 series that achieves improvement in operability, high function, high performance, and intensive analysis and display functions over the conventional portable surface roughness tester Surfest SJ series capable of surface roughness management at every worksite and intends to introduce this new series to the domestic market on and after March 1, 2010, gradually expanding sales into overseas markets.
Since the current model SJ-201 series' release in January, 1998, the series has been well received in the market. In the compact surface roughness tester market, however, the users are extending the scope of its application, thus requiring a further improvement in function. For example, a compact surface roughness tester is used for management of machine tools such as checking cutting edges for abrasion and determining the time to replace a cutting tool in addition to the quality control of workpieces. On the other hand, the market needs for improvement in ease of operation and further price-reduction are still increased.
To respond to the needs of the marketplace, the SJ-210 series has further improved in basic performance as a surface roughness tester. The SJ-210 inherits one-touch detachment/attachment between an integral type and a discrete type of a palm-size compact body and a detector drive directly from the current model SJ-201, furthermore being equipped with a high-legibility color-graphic LCD. The SJ-210 allows you to freely select a display language from among 16 supported national languages (multiple languages). It provides a measuring range of 17.5mm on the X axis (5.6mm for the traverse-tracing type) and a resolution of 0.002μm for a high degree of accuracy. Three types of drive units are available: standard type, detector retractable type and traverse-tracing type. The external input/output interface is compatible with the five types of interfaces: USB I/F, Mitutoyo-unique Digimatic output, printer output, RS-232C I/F, and footswitch I/F. Power is supplied from either of the two power supplies, built-in Ni-MH rechargeable battery or AC adapter. The optional memory card can save a large amount of measured data and measuring conditions. A measured result including recorded profiles can be printed on a 35m thermal paper role using the optional SJ-210 dedicated printer. Particularly, the adoption of backlight has drastically improved the 2.4-inch color graphic LCD (display area: 36.7 X 48.9mm) in legibility during user operation at a dim worksite.
[ Main Features ]
●
|
Various display functions condensed in a compact body
Equipped with the 2.4-inch high-legibility color graphic LCD drastically improved in visibility and operability thanks to the adoption of backlight, displaying a GO/NG judgment result in color. In addition to measurement result data, an evaluation profile, bearing area curve, and amplitude distribution curve can also be displayed clearly.
|
●
|
Putting emphasis on the simple layout of operation keys
Color icon display similar to a cell-phone, easy-to-understand screen structure and arrow keys achieve intuitive operability. The operation keys that are not used frequently can be accommodated under a slide cover to prevent them from operating erroneously.
|
●
|
Data storage function facilitating data acquisition on site
This function allows the internal memory to store up to 10 cases of measurement conditions and can read out an appropriate measurement condition according to a workpiece in a single operation. A memory card (optional micro-SD card) can store a lot of measuring conditions (500 cases), measurement data (10000 cases), and graphics data (500 cases), serving for data acquisition and documentation at a site.
|
●
|
Expanding the field of various surface roughness measurement taking advantage of the mobility of a battery-drive tester
This series supports measurement in every detector's attitude such as vertical and upward orientations (wall and bottom surface measurement). Additionally, the concurrent use of an optional drive unit accessory or height gage adapter allows the detector/drive unit to be set in various orientations according to a workpiece.
|
●
|
Abundant variation in combination of detector, drive unit, and calculation/display unit according to a measurement scene
A standard detector is selectable from the two types with a measuring force of 0.75mN or 4mN. A drive unit is selectable from among the three types of standard type, detector-retractable type, and traverse tracing type. The detector-retractable type always puts the detector in a standby state at the retraction position not to cause damage to it when inserted in a workpiece. The traverse tracing type is optimal for measuring a narrow portion such as a crankshaft and an electrical discharge machining part.
|
●
|
Compatible with diverse standards
Compatible with JIS (JIS B 0601-2001, JIS B 0601-1994, JIS B 0601-1982), VDA, ISO-1997, and ANSI standards and also supports traverse roughness parameters and special parameters.
|
●
|
Provided with the profile display function of evaluation profiles, etc.
This function allows display of a calculation result in each sampling length, evaluation profile, bearing area curve and amplitude distribution curve in addition to calculation result data.
|
[ Major Specifications ]
Measuring range
|
:
|
Z-axis (vertical) / 17.5mm (standard type, retracting type), 5.6mm (traverse tracing type)
X-axis (horizontal) / 360μm (-200μm to +160μm)
|
Evaluation profile
|
:
|
Primary profile, roughness profile, DF profile, roughness motif profile
|
Analysis graph
|
:
|
Bearing area curve (BAC), amplitude distribution curve (ADC)
|
Parameter
|
:
|
40 types including Ra, Ry, Rz, S, and Mr that are customizable
|
Cutoff length
|
:
|
λc = 0.08, 0.25, 0.8, or 2.5mm
λs = 2.5 or 8mm
|
Standard
|
:
|
JIS (JIS B 0601-2001, JIS B 0601-1994, JIS B 0601-1982), VDA, ISO-1997, and ANSI
|
Print function
|
:
|
Measuring condition, calculation result, calculation result in each sampling length, measurement curve, BAC, ADC, and environmental setting condition
|
Power supply
|
:
|
Two power supplies of built-in Ni-MH rechargeable battery and AC adapter
|
External dimensions
|
:
|
Calculation/display unit; 52.1 (W) X 65.8 (D) X 160 (H) mm, drive unit; 115 (W) X 23 (D) X 26 (H) mm
|
Mass
|
:
|
Approximately 500g (total mass of the detector, drive unit, and calculation/display unit)
|
|


