 |
New Release of "Bore Gage" - Fully-remodeled Inside Diameter Measurement Tools 
Mitutoyo Corporation (Headquarters: Takatsu-ku, Kawasaki-shi, President: Toru Nakagawa) has developed and commercialized "Bore gage" in which the flagship models of inside diameter measurement tools/bore gages are fully remodeled. Mitutoyo intends to introduce this new series to the domestic market on and after May 21, 2010, gradually expanding sales into overseas markets.
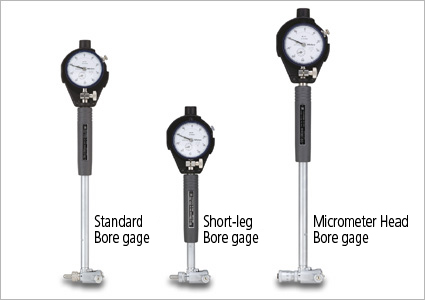
Bore gages are widely used as a best-seller among inside diameter measurement tools on the machining shop floor and other sites. A bore gage , used as one of dial gage applied products, is an inside diameter measurement tool that converts an axial movement of the contact point into a movement vertical to the axis to read its displacement visually. To measure an inside diameter, check a datum point using a ring gage of which the nominal size is defined, and then perform comparative measurement of the diameter to the ring gage size. This series of bore gage is extremely easy-to-operate and convenient for massive measurement of workpieces with the same shape. Since the first production of Mitutoyo bore gages in 1956, they have gotten a favorable reception on the market as a measuring tool capable of performing precision measurement of various inside diameters with ease and at a low cost, while continuously releasing new models to meet diversified needs such as a small-diameter type, standard type, short-leg type, shallow-hole type, micrometer head-equipped type, indicator-integrated type and rugged type depending on the measuring range, structure, and the shapes of measuring head and guide plate. The just-released Bore Gage has achieved smooth operation and long operating life by reviewing the materials and shapes of various components to meet the need for still higher-accuracy inside measurement and more improvement in operability and durability. The Bore Gage inherits the conventional simple structure as is, therewith improving the measuring accuracy of all models by 50% or more than that of predecessors, expanding the contact point stroke of flagship models as much as 33%, and improving abrasion resistance and surface roughness by using carbide balls for the contact point in touch with a workpiece and the tips of each anvil. Additionally, this series reduces the influence of temperature from the operatorÕs hand as much as 50% by increasing the size of the grip to be held by hand during measurement by 20% and also making the grip hollow-structured (design registered in Japan). Major accessories such as anvils, replacement washers, and extension rods are compatible with those of existing models. Total 16 models in hot-selling sizes are introduced this time on the market including the flagship models with a measuring range of 50 to 150mm (standard type: Code No. 511-703, short-leg type: Code No. 511-763).
[Major Specifications]
[Major Specifications]
For detailed information about features, specifications, standard prices, etc., refer to "Catalog No.E3051 Bore Gage"
|